Thursday, October 31, 2013

Halloween Fun

Boo! It was raining off and on here all night, but my kiddos didn't seem to mind they only went to about 7 houses! I wonder when that will end? They were more excited to hand out the candy and sneak a piece here and there.

Sums up my kiddos: L could care less, T is hamming it up and O is on the move!

This year L wanted to be Jesse from Toy Story, so I typed in DIY Jesse costumes and thank goodness I was up on Breaking Bad because that's what popped up with maybe one or two pics of Jesse from Toy Story mixed in. I headed to the second hand shop to buy her a white button up shirt and jeans because she doesn't own either. As I was searching I came across this amazing red hat and some white fur like material, bingo! I brought it all home and started working on L's Jesse costume. I took the red hat and replaced the red ribbon with white and punched holes in the edges to lace white yarn through. The white fur material, I used black paint mixed with fabric medium and painted black spots to give it that cow hide look. I used yellow felt to make the top of her shirt and around the cuffs, then I added red ribbon to the felt, and I finished it off with using white and grey felt to make the oversized buttons on her shirt and cuffs. After the paint was dry I cut the white fur material to fit on the front of the jeans. When I realized it was going to shed like a huge dog I had some black bias tape and wrapped the edges in that to tone down the shedding! I sewed the top and bottom to the jeans with my machine and then went back and hand stitched the sides down. I did go and buy the belt and boots from a local farm supply store, but I've been wanting to get her a pair of boots for awhile now so that was my excuse.

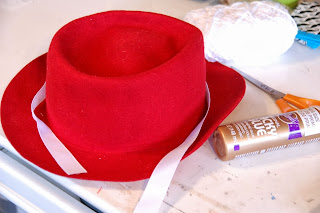
Red felt hat, great find at thrift store!

White fur material I painted to look like cow hide.

Added yellow felt and red ribbon to top of shirt.

Sewed cuff on the wrong side of cuff, then flipped it over so shirt wasn't so long.

Chaps on jeans after binding them.

Giddy Up!

T this year couldn't make up his mind: a puppy, a boy unicorn, something from Monsters Vs. Aliens, a lion, etc, etc! At the end of September I told him that was it, he had to figure it out so I could make it. He picked a black cat! Which worked out great because L was a black cat 2 years ago and it's actually a costume my Mom made for me when I was younger, we just had to add the tail that went missing! I picked up some face paint crayons and he was set.

Black cat, don't let him cross your path!

I thought for O it would be nice if we didn't have to carry her but she could ride in the wagon and I remember seeing somewhere a mouse in a mouse trap. I actually found a gray hoodie and added felt ears and a felt pink belly to it, super easy and fast. I used a large cardboard box to make the top of the "mouse trap" that would just sit on the wagon with a hole cut out where she was sitting. It really turned out so cute but she wanted nothing to do with riding in a wagon so she started ripping the mouse trap up! Plus it was raining here tonight so we nixed the wagon idea but she was the cutest little mouse ever. She wanted to hand out the candy so bad to all the trick or treaters, when she wasn't trying to eat through the candy wrappers.

Cutest mouse ever!

We did carve pumpkins Monday after school, well I can't say we really carved them, we cleaned out 2 of the 3. At 5 tonight I remembered we never carved them, so my husband gave the pumpkins faces at 5:30, right before our first trick or treaters! Why is it that I always forget how much I hate to carve pumpkins, maybe it's like child birth! You know, going through it, it's the worse thing ever but there you are doing it again. All the bad memories have been completely erased and you only remember the good. Every year it takes forever to cut the top off then the kids are cool with digging out the guts for about 2.5 minutes and then who's left to finish and clean up, Oh yeah, that would be me! Someday they will do it all by themselves, right?

The 2.5 minutes they are interested in the pumpkin!

Even though I dislike carving pumpkins it does make for some cute photos!


Tuesday, October 29, 2013

October Make and Take Craft Weekend

Can I just say, what an amazing group of ladies we had this weekend and how awesome the weekend was! I'm totally bummed it's over! We had so much fun getting to know each other, laughing together, watching everyone's different creative styles come to life, shopping together and sharing yummy meals together.
Name-tags

Goodie Bags

Friday night we settled in with dinner at the farm tables, then it was off to the Craft Room to begin our ruffle bags and to start on the mason jar vases. The ladies all came up with such awesome combinations for their ruffles. I love to see all the colors and prints that are put together, it's always very inspiring!
Sharing dinner together

Laying out the ruffles

Sewing

Pinned ruffles

Pressing hems

Sewing

Finished Ruffle Bags

Mason jar vases

Sewing

Saturday morning, after a make your own waffle breakfast, we headed out to do a little shopping. Our first stop was The Vintage Farmhouse, which has such great stuff and it's always changing so you never know what you might find! Our next stop was Tanglewood Cottage, that has one of a kind bigger pieces which I would love to add to my house! Lunch was at The Blue Duck and was delish as usual, then the ladies walked around downtown for a bit and did some more shopping.

Waffle bar

The Vintage Farmhouse

The Vintage Farmhouse

Me at The Vintage Farmhouse

Tanglewood Cottage

Picked this beauty up at Tanglewood Cottage for The Craft House

Debbie, Olivia, Teresa, Hannah, Cindy, Maria and Sheree

Back at the Craft House we jumped right in with the next round of crafting. Dinner was thrown in the mix along with cheering the Cardinal's on to a victory! These ladies were pretty serious about their crafting and worked so hard but we still had a lot of laughs together.

Infinity scarf

Scarf with flower pin


Sewing

Paper crafting

Finished autumn wreaths

Burlap runners

Burlap runners

Sunday was a sleeping in kind of morning, another yummy breakfast and finishing up the mason jar vases. We had some fun with picture taking and lots of hugs goodbye to end the morning!

Blueberry monkey bread, yummy!

Distressing mason jars

Finished mason jar vases!

I just loved these ladies that came this weekend and had such a wonderful experience with all of them! Feeling truly blessed to have had the chance meet them and share this time with them!

If you want more information about Make and Take Craft Weekend check out the website.


Sewing Swap Part 3

For my last Create Kids Couture sewing swap partner I had to make an outfit in a size 2, I knew just what pattern I was going to use. Every time I look through my patterns I see The Madeline Dress by Me Sew Crazy and think it's so cute but neither of my girls would fit into the sizes it's available in.

I had the material on hand and decided to make the dress. The material for the skirt looks like it's different stripes of material pieced together but it's just one piece of cotton and the bodice is the red and black abstract pattern that is on the skirt. The top arc bodice is a black with a white design on it. The buttons on the back are vintage black buttons I found at a store in Michigan while on vacation there this past summer.

There are 2 options of sewing the bodice portion and I really wish I had read through them both and then made the decision, but I'm horrible about reading through the entire pattern and then getting started! The way I constructed it left an exposed seam between the bodices under the arms, but I tacked it down so it shouldn't be seen. After I had put the skirt onto the bodice I just thought the dress looked so short to be an actual dress so I checked and rechecked the skirt length and I cut it out correctly. Since I thought it was so short but didn't have a size 2 to try the dress on, I also made a pair of black Go To Leggings to wear underneath it. Turned out to be a great decision because it was too short to be worn like a dress

Turned out to be a very cute tunic top, just have to figure out if there has been some issues with the actual measurements of the skirt part and why mine was so short. I hope my sewing swap partner enjoyed the outfit. It was such a fun experience to be a part of, not knowing what your partner was going to make for your kiddo, getting a package in the mail, and the surprise pattern and materials chosen. Almost like Christmas for the sewing world!


Friday, October 25, 2013

Sewing Class Week 4

This week was the ladies last week of Sewing Class and I hope they continue their sewing adventures into the future! It was so much fun working with these ladies and the laughs were great! Just a few hiccups with machines malfunctioning, sewing pockets shut and pressing wrong sides together instead of right sides together!

This evening our projects were to make pillowcase dressings for Project 23 for Craft Hope. I'll mail these dresses off to go to developing countries for young girls to wear! We also did some selfish sewing and they made knit infinity scarfs now that the cooler weather is here to stay.


If interested in learning how to sew I will be teaching another Sewing Class starting in November, register here.

Monday, October 21, 2013

Sewing Swap Part 2


This is the second outfit I made for the Create Kids Couture Swap that I did last month. I got paired with a partner for each of my kids ages/sizes and we each made surprise outfits for each other. This is The Goodship Dress that I have had stashed in my patterns for quite some time and just never made it. What a great excuse to pull it out and make one up, because it is so cute! I used some pink with brown button print corduroy from Jo-Ann's for the main dress and brown cotton for the collar, pleat and bow.

The pattern was a little confusing at times, for instance, it just tells you to make binding but never says if it's single or double fold and I had to figure it out for myself. I think this pattern is for an advanced beginner just because there are some parts that you really need to think over, or maybe it's just me!

I love how this dress turned out and it will be great for colder months layered or alone in the warmer months. I'll have to make my daughter one for herself now!


Sunday, October 20, 2013

Rose T-shirt Pattern Testing

I had the opportunity to test the upgrade of the Rose T-shirt by Melly Sews and I can't wait to make a few more for my fall/winter closet this season.

I cut out the longer shirt and after I sewed it up I realized that longer knit tops don't look that flattering on me so I decided to cut off 3 inches, well I shouldn't attempt these things late at night. Instead of the 3 inches, I cut 5 inches off so now the top is just a tad shorter than I wanted but I still love it.

It was an easy and fast sew. I did it all in one day along with taking care of the kiddos. I ended up not hemming it since I cut it so much shorter than I wanted and since knit doesn't fray it's fine, just curls a little at the ends.

I used a jersey I got from Girl Charlie awhile back with a scrap piece of woven I used to make my daughter's dresses for family pictures last month.

I ended up topstitching the woven material so it laid a little flatter and had to trim the sleeves because they were too long for me. I loved the pattern and now it goes up to a size XL, I highly recommend it. Also check out her selection of kid's patterns, they are all so darn cute!


Skip To My Lou

150x200